LIKEtoKNOW.it Bloglovin instagram Pinterest facebook
  • Home
  • Favorites
    • Favorites
    • Shop My Instagram
    • Nursery
    • Home Decor
  • Where I Shop
    • Target
    • LOFT
    • Old Navy
    • Amazon
  • About
  • Life Style
  • Disclosure

Kaplan Party of Three

Congratulations! You're pregnant....so when do you tell everyone?

How exciting right? You can't wait to share the happy news with everyone you know and love! So why wait? 


Who should I tell first? When can I tell everyone else? How should I tell them?

To give you better advice, here's what we did for both babies.

<span>Photo by <a href="https://unsplash.com/@camylla93?utm_source=unsplash&amp;utm_medium=referral&amp;utm_content=creditCopyText">Camylla Battani</a> on <a href="https://unsplash.com/s/photos/pregnant?utm_source=unsplash&amp;utm_medium=referral&amp;utm_content=creditCopyText">Unsplash</a></span>
Photo by Camylla Battani on Unsplash


Who Should I Tell First?

Well, I think most importantly, your partner should be first to know. After I confirmed both of my pregnancies, I was too excited to be creative with how I told my husband. It's important to discuss together when you're comfortable and who you're comfortable with breaking the exciting news to first.

When Can I Tell Everyone Else?

This is a tricky question. Some people can't wait to tell everyone, and that's ok! The special thing with that is if there ends up being complications, this group of people will be your biggest supporters during that time. Others prefer to wait until an ultrasound has been performed between 7-10 weeks. While some want to safely wait until they are in their 2nd trimester or after the risk of miscarriage has gone down significantly with time. 

On a side note, if you do tell anyone right away, it's important to advise them if you want the news to stay private or not. This is exciting news, and it can be hard for some to keep this secret to themselves. 

Personally, I chose to make the news public to everyone after our first ultrasound. Close family and friends heard the news first, and then I made a post on social media.


Tell My Boss?

It'd be a good idea to look over your employer's policy for maternity care and possible leave time. Once you've told your boss, and worked out a plan, then I'd say it's green light to tell coworkers! 

How Should I Tell Them?

Oh boy, there are SO MANY WAYS to surprise people with your pregnancy announcement. Pinterest is a great resource for ideas, if you don't mind taking the time to sift through posts. Depending on the time of year, your personality and budget you can get really creative. 

I've told Everyone, Now What?

I started on my baby registry right away. I wanted to fine tune what was necessary, what was luxury, or items that groups could contribute to. That way, if anyone asks in the meantime before your baby shower (if you have one) you'll be prepared to answer what's needed.

Cons of Waiting 

You may lack the support you need during tough times in your first trimester.
If your job is labor intensive or physically demanding you may be risking injury by not informing your employer.
News about your pregnancy might come from someone else other than yourself.


All things considered, you'll know when the time is right to share your happy news. 
When did you tell others that you were pregnant? Did you have a create ways to telling people you were pregnant?

 Maternity Clothes Must-Haves

You don't have to spend a ton of money on maternity clothes, but here are my must-haves for being comfortable and stylish without breaking the bank.

My list includes what's in my closet and what I've added to my wishlist.


 How to Properly Store Breast Milk

Looking to create a freezer stash? Want some extra help during bottle feeding? Or preparing to return back to work?

Here's a guide to properly storing breast milk either through hand expression or pumping. 


Rule of 4's

The way I used to remember how to store my breast milk after pumping was the Rule of 4's. 

  • Keep milk at room temperature. Breastmilk is OK for up to 4 hours after pumping at room temperature (up to 77°F).
  • Refrigerate it. Breastmilk is OK in the refrigerator for up to 4 days.
  • Place milk in the freezer. If you're not going to use refrigerated breastmilk within 4 days of pumping, freeze it right after pumping.
  • Use cooler packs. You can put breastmilk in a cooler or insulated cooler pack with frozen ice packs for up to 24 hours after pumping. After 24 hours in a cooler the breastmilk should be refrigerated or frozen.
Personally, I never produced enough milk to stash any in the freezer, but these guidelines are provided by womenshealth.gov with other helpful tips!

Storage bags I used most often were these Lansinoh Breastmilk Storage Bags


If you'd rather not use disposable bags, a clear and clean glass jar with a tight fitting lid works great too!

A great way to keep things organized in your fridge are these mDesign Container Bins


If you are working towards creating a stash in your freezer, here are some tips:

Tips for Freezing Breast milk

  • Clearly label milk containers with the date the milk was expressed. Include your child's name if you are giving the milk to a child care provider.
  • Freeze in small amounts (2 to 4 ounces, or ¼ to ½ cups) for later feedings.
  • Leave an inch or so from the milk to the top of the container, because it will get bigger when freezing.
  • Wait to tighten bottle caps or lids until the milk is completely frozen.
  • Store milk in the back of the freezer, not on the shelf of the freezer door, so that it doesn't start to thaw out.
Organize and store your breast milk using this Milkies Freeze"First In, First Out" storage system


Below is a guide to storing fresh breast milk for use with a healthy, full-term baby

Place

Temperature

How long

Things to know

Countertop, table

Room temperature (up to 77°F)

Up to 4 hours

Containers should be covered and kept as cool as possible. Covering the container with a clean cool towel may keep milk cooler. Throw out any leftover milk within 2 hours after the baby is finished feeding.

Refrigerator

40°F

Up to 4 days

Store milk in the back of the refrigerator. When at work, it's OK to put breastmilk in a shared refrigerator. Be sure to label the container clearly.

Freezer

0°F or colder

Within 6 months is best.

Up to 12 months is acceptable.

Store milk toward the back of the freezer where the temperature is most constant. Milk stored at 0°F or colder is safe for longer durations, but the quality of the milk might not be as high.


Storage: Tips for Thawing and Warming Up Milk

  • Thaw the oldest breastmilk first.
  • Breastmilk does not need to be warmed. Some moms prefer to serve it at room temperature. Some moms serve it cold.
  • Thaw the bottle or bag of frozen milk by putting it in the refrigerator overnight.
  • If you decide to warm the breastmilk:
    • Keep the container sealed while warming.
    • Hold it under warm, not hot, running water, or set it in a container of water that is warm, not hot.
    • Never put a bottle or bag of breastmilk in the microwave. Microwaving creates hot spots that could burn your baby and damage the milk.
    • Test the temperature before feeding it to your baby by dropping some on your wrist. The milk should feel warm, not hot.
  • Swirl the milk to mix the fat, which may have separated. Do not shake the milk.
  • Use breastmilk within 24 hours of thawing it in the refrigerator. This means 24 hours from when the breastmilk is no longer frozen, not from when you take it out of the freezer.
  • Once breastmilk is thawed to room temperature or warmed after being in the refrigerator or freezer, use it within 2 hours. If you have any leftover milk when the baby is finished feeding, be sure to throw it out within 2 hours.
  • Do not refreeze breastmilk after it has been thawed.

If you have more questions, your doctor and lactation consultants are great resources.

Do you have any tips and tricks you like to use when storing breast milk? What method works best for you?


This post may contain affiliate links. Using links to these sites means I may earn a percentage of the purchase at no extra cost to you.

“Pumping and Storing Breastmilk.” Womenshealth.gov, 9 July 2018, www.womenshealth.gov/breastfeeding/pumping-and-storing-breastmilk.

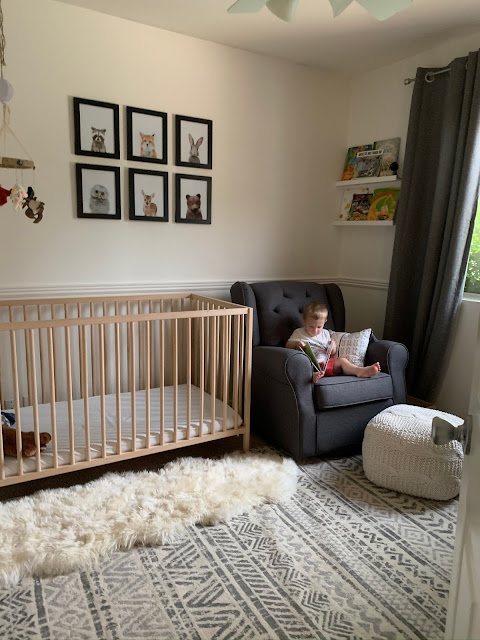
 Toddler Room Makeover

Looking to refresh a room on a budget? Here's what I did for my 2 year old's room. 

When we first purchased our home last year, the biggest eye sore was what was going to be Ryan's bedroom. It is one of four rooms in the house, but every wall was painted with both hot pink and neon green. There were purple sequin curtains, brown stained (with blue nail polish) carpet and it was the hottest room in the house. 


The cheapest, biggest and easiest upgrade you can make in a room is paint. I had a vision of a much softer appearance and something that would appeal to more than just my taste. So I went with Sherwin Williams "Bistro Cafe" using Valspar 2000 paint in eggshell. I've painted room with flat paint before, and you learn quickly that it's not wipeable. And for a toddler boy's room...the walls definitely need to be wiped down occasionally.

BEFORE


AFTER


If you've never painted a room before, it's super easy, and here's how I do it.

Things You'll Need:

  • Primer Paint
  • Tinted Paint (About 1 gallon per small bedroom)
  • Rollers
  • Angled Brush
  • Bucket
  • Step Ladder
  • Screw Driver
  • Plastic Cover
  • Rags
  • Paint Tray (Both plastic and metal tray)
  • Plastic Ziplock Bags

Find Inspiration

I looked everywhere for ideas on how I wanted Ryan's room to look. Pinterest, Houzz, and considered just using the paint color I painted the interior of our last house. I had to go a different route than what paint I used before because Ryan's current bedroom doesn't have as much natural light as our house in North Carolina. I had some leftover paint in the garage from the previous owners, but everything was still too dark and heavy for that room. I also needed something I could get same day, that was relatively inexpensive, timeless and would match the rest of the house. 

Test the paint you like

Make sure the paint you got is the color you really want and paint a sample of it on the . Make the swatch on the wall big enough so you can imagine it on the entire wall, and paint it on more than just one wall.


Prepare the Room

Once you've decided on the color you like and have all of your materials ready to go, it's time to start preparing the room you're painting. Ideally, the room should be empty when you're painting. Instead, I moved all of the large furniture items to the middle of the room and covered them to protect against paint splatter. I temporarily setup the crib for Ryan in another room so I could paint while he napped and avoid having him in a room with paint fumes. 
Next, I removed the old dingy curtains, shelves, and blinds then wiped all of the baseboards and chair rail clean. I also removed all of the outlet covers and put them in a marked plastic bag so I didn't lose any pieces. 

You should consider filling any holes in the walls, changing air filters and replacing the batteries in the smoke detectors. That way, it's like a brand new room when you're finished. I went another step further and even replaced the bulbs in the ceiling fan.

I don't care for the carpet in that room, and it's already stained so I didn't put anything down to protect it, where normally I would have plastic or flattened cardboard boxes down. 

Cut the edges

I don't use painters' tape. I've tried all kinds of tape and techniques, but what works best for me is a brand new angled brush to cut all of the corners and trim. I start in one corner at the ceiling, work my way clockwise around the room, and down the corners, and finish with the baseboards.

Since I didn't want any hint of the dramatic colors coming through the white paint, I started with Killz water-based all purpose primer. This tuff means business. I'd rather paint over a clean slate, than paint multiple layers of the same color, just to see some of the previous color underneath.

Roll

After every corner and edge is painted, it's time to roll your primer. Be generous and even with these coats. You can always get more paint, but it's a pain to have to go back again if you missed a spot or were not liberal enough the first time. I start in the same corner where I started cutting the edges and work my way from top to bottom, left to right rolling the primer. Once you're finished, the primer will probably need a few hours to completely dry before you should attempt the next paint color.

Wash Your Tools

Nothing is worse than dried paint on your rollers and brushes. Make sure you thoroughly wash your tools of all paint before calling it quits. I'll usually take everything I've used outside and run the hose over the tools until the water runs clear. Shake em out and leave them outside to dry.

Repeat (Cut, Roll, Wash)

Once your primer is dry, now it's time to start cutting the edges with your next paint color. After that is done, roll! Now wash your rolls and give the paint time to dry.

Touch Ups

When the paint is done drying, I'll go back through and make sure there aren't any bare spots and the color is applied evenly.

Put everything back

I put all the furniture back, hung up some fun pictures, installed some shelves, replaced the blinds, and hung new curtains. To help block out the light from the window and hopefully cool off the room, I got blackout curtains and they work great! They were simple to install, fit the window perfectly and do what they're advertised to do. Framing the window with long curtains helped to make the window appear bigger, help block out all of the sunlight for napping and add a little color and texture to the room. Since I disliked the carpet but wanted to makeover the room on a budget, I got a rug and am really happy with how it looks.

Tips & Tricks

  • Typically, paint dries a darker color than when it's first painted and wet on the walls. Be mindful of that when you're painting a room, especially when painting a swatch on the walls before you start.
  • If you have to take frequent breaks, like I did, a quick tip is to put your wet paint tools in a ziplock bag. I'll put a paint brush in a gallon size ziplock bag, so the paint doesn't dry while I have to stop and come back later. If you need to stop while you're rolling paint, you can do the same thing with a large garbage bag. Put your roller in the paint tray, and put the entire thing inside the garbage bag and tie it shut. These are just temporary solutions, so if you know you'll be done for the day, be sure to thoroughly wash your tools.
  • I like to "Fix" the fibers on my paint brush after it's been washed. If there's hairs sticking out of place, manipulate them back into shape so when it dries it will be the right shape and no strays will get in the way the next time you paint.
  • I like to have a small bucket of warm water and rags handy while I paint. Sometimes I have an oops and need to wipe something up quickly, or wipe my hands occasionally.

I am not a professional painter, this is just advice and what I do when I paint a room.
Have fun!

This post may contain affiliate links. Using links to these sites means I may earn a percentage of the purchase at no extra cost to you.

My Favorite Toddler Toys

Looking for something that will entertain your toddler for more than a day? And something that will last?

I've put together some of my favorite tried and true toddler toys. My two year old has been playing with these toys since they arrived and still enjoys them!


Melissa & Doug African Plains Jigsaw Puzzle 24 pc

Most of the toys I have are from Melissa & Doug. I appreciate the quality and attention to detail in their toys and know they pass the durability test in my house. This type of activity may not be for all toddlers, but my son, Ryan, really enjoys working on and mastering puzzles. After a few days he could put the puzzle together by himself, but still likes to play with it. 

Melissa & Doug Latches Board

Another Melissa & Doug favorite is this Latches Board. It has 6 unique locks/latches and behind each door is a surprise animal! Ryan has been learning his numbers too, so this gives him good practice to remember, recognize and say each number. 


Melissa & Doug Pull-Back Construction Vehicles


Can you tell I like this brand?! These are definitely a favorite for Ryan too. These squishy pull-back cars are so much fun! This will keep Ryan busy and proof that kids' toys don't need a bunch of flashing lights and buttons to be fun. 

Coogam Wooden Shape Color Sorting Clock


This toy has more to it than just being a toy clock. Kids can learn about their colors, understand how to tell time, sort shapes and practice their numbers! 

Coogam Wooden Jigsaw Puzzle Set


This is another brand I appreciate. This set came with 6 different animal shape puzzles. If you like to rotate toys for your kids, this would be easy to incorporate a different puzzle every week. 

Melissa & Doug Water Wow Bundle


If you need an option for traveling with kids, these activity pads are a great consideration! Ryan likes to curl up on the couch and color these all the time. Coloring books are great, but these are reusable and only need water in their pen that's included. 

Melissa & Doug Dust! Sweep! Mop!


I noticed Ryan wanted to follow me around when I'd be dusting or sweeping, so I thought, why not encourage me to help me with some tools of his own! This open-ended toy inspires him to help me clean the house, and teach him to responsible to put everything back on it's stand. 

Click N' Play Gigantic Keyboard Play Mat


Ok, prepare yourself. Ryan LOVES this keyboard. He will play with this all day! I set this up in the playroom on the carpet because it slides on the hardwood floor when he really gets to running around on it. It can get a little annoying if some of the tunes repeat a hundred times, but well worth it in my book.


Do you have any favorite toys for your toddler? What are some timeless toys you can't live without?


This post may contain affiliate links. Using links to these sites means I may earn a percentage of the purchase at no extra cost to you.


February Beauty Empties

Every month I try to find products I've used every last drop of and share whether I'll be replacing it with something new, or reordering because it's that good!
This month, I changed up my mascara, lipstick, concealer AND eyebrow makeup. 

You can see what my everyday makeup tutorial included originally, here!
Newer Posts
Older Posts

HELLO, THERE!


Hello, There!
Hello, There!

Hi! I'm Emily, a Phoenix Desert Mom and Wife. Hoping to share my experiences and learn new things through the journey of parenthood


Find More


Follow Me

PROMO POST

Makeup

Contact Form

Name

Email *

Message *

Popular Posts

  • Things I Wish I knew Before I Was Pregnant
  • DIY At-Home Manicure
  • Our Birth Story

Sponsor

Created with by beautytemplates